Angular Ivy - 第三代Angular渲染器的完整指南。

更小的捆绑包,更快的编译,更方便的调试,还有模块和组件的动态加载以及高阶组件等等高级概念。

一年多以前,Angular核心团队在ng-conf上宣布他们正在研究Angular Ivy,尽管它还没有100%准备好投入生产,但我觉得这是一个深入了解 Angular的新版本渲染器的好时机。

经过漫长的等待,Angular版本8发布!

这是一个主要版本,带来了许多很酷很重要的功能,例如差异加载,新构建器API,Web-Workers支持等等。

但最重要的是,Ivy终于来了!


正文

为什么关注Ivy

首先-移动设备!

这也许听起来疯狂,但确实我们有63%的在线流量来自智能手机和平板电脑。到今年年底,80%的互联网使用预计将来自移动设备。

我们面临的最大挑战之一是前端开发人员是加载网站尽可能的快。不幸的是移动设备经常因为坏或缓慢的互联网连接,使这种挑战变得更加困难。      

另一方面,我们可以使用许多解决方案加载应用程序更快.例如从最近的云的CDN节点请求文件,PWA缓存的资产文件等。但是我们能为开发者做的是最大程度减少包的大小.

减少捆绑包大小

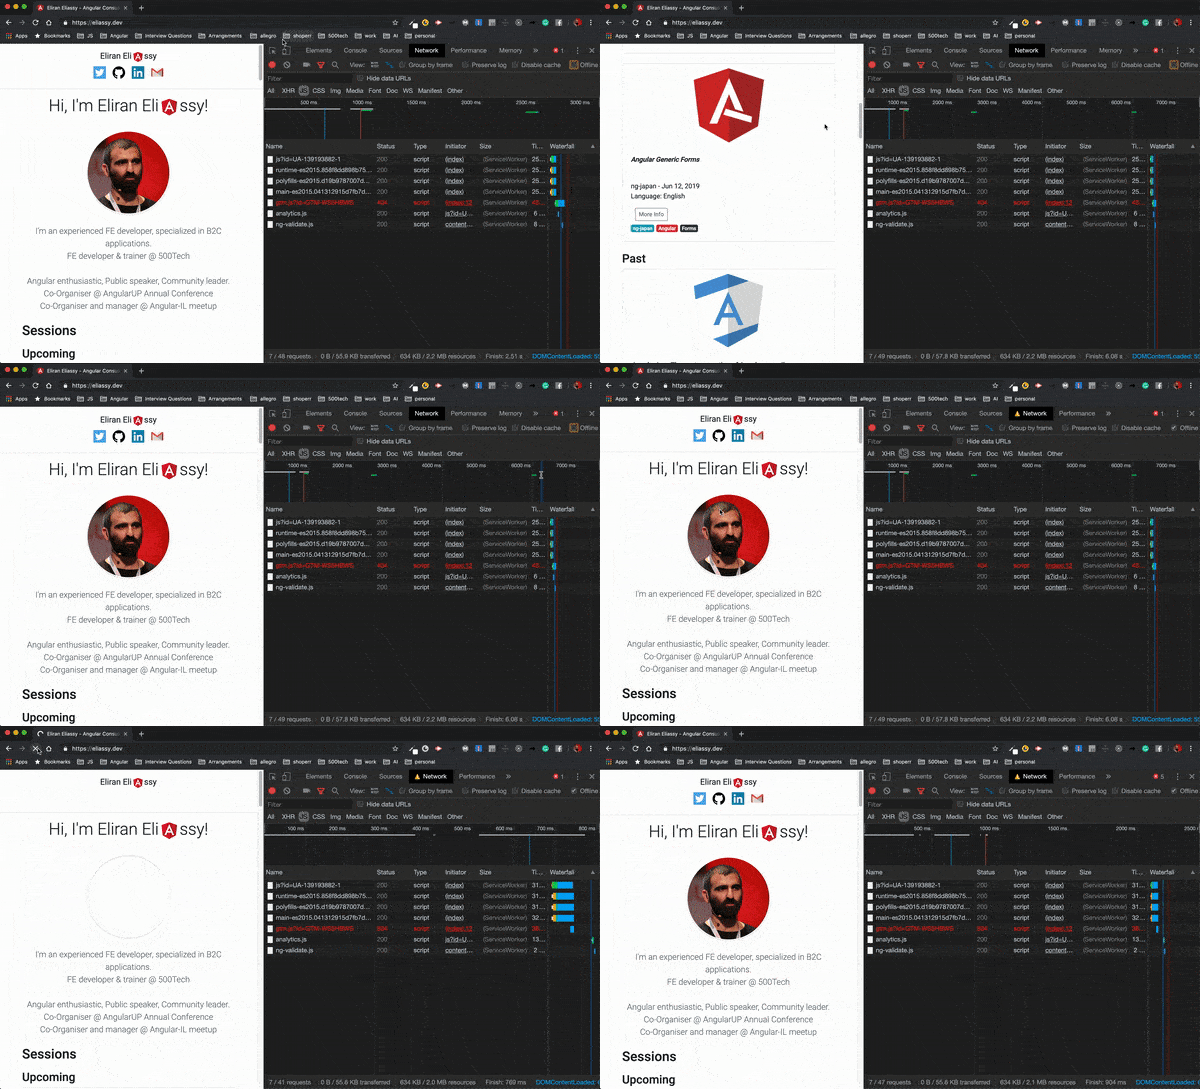
所以…捆绑大小。让我们看看它的实际效果。我们以eliassy.dev 作为案例研究。这是一个使用Angular构建的简单网站,它看起来很简单,但它使用了许多核心功能。它还使用Angular PWA包来支持离线和Angular Material与Animation模块。
图片标题

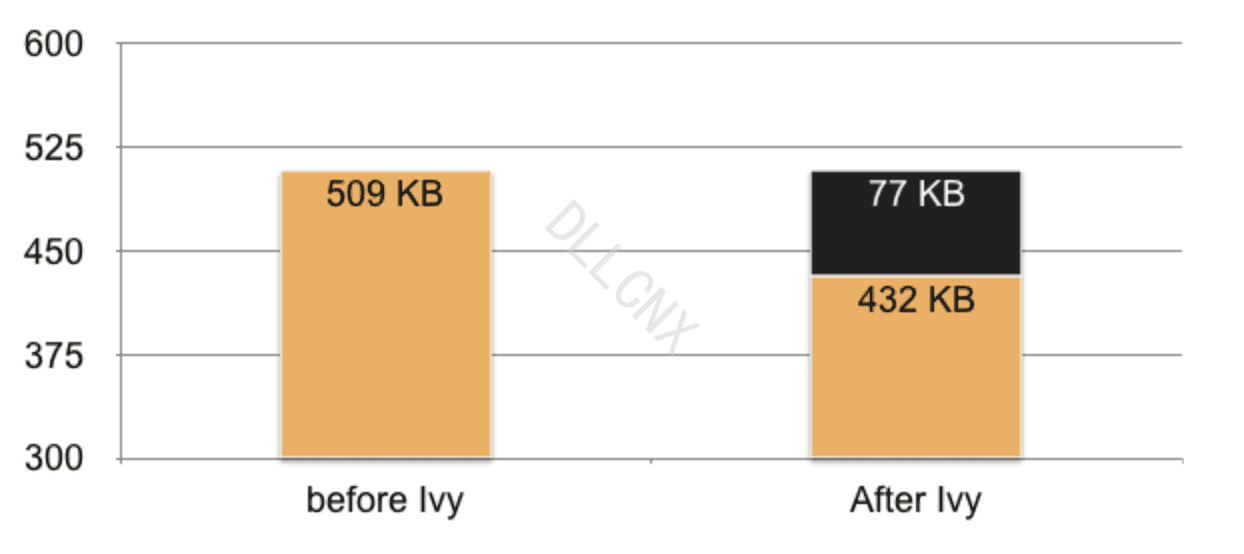
在Ivy之前,我的主要重量超过500 kb。

title

现在让我们选择加入Ivy,编辑tsconfig.app.json并添加一部分angularComplierOption并设置enableIvytrue。对于新的Angular CLI项目,您可以--enableIvy在运行ng new脚本时使用该标志。

1
2
3
4
5
6
7
8
9
10
11
12
13
14
{
"extends": "../tsconfig.json",
"compilerOptions": {
"outDir": "../out-tsc/app",
"types": []
},
"exclude": [
"test.ts",
"**/*.spec.ts"
],
"angularCompilerOptions": {
"enableIvy": true
}
}

现在让我们再次使用构建应用程序 ng build —prod:

title

我们可以看到我们的捆绑包收缩了77KB,这是捆绑包大小的15%,这意味着我们网站的加载时间将快15%。
title

你们中的一些人可能会因为我们只削减了15%的捆绑大小而感到失望。原因是即使这是一个小项目,它仍然依赖于许多核心功能,而目前,Ivy主要是削减生成的代码,而不是框架本身。

Stephen Fluin刚刚发布核心团队仍在努力使捆绑包的尺寸更小:

“我们现在正在努力减少框架大小,以便在将Ivy作为默认设置之前,我们几乎在每种情况下都减少了实际应用程序的包大小。由于我们提供了新的引导方式,因此我们还可以获得额外的好处。

他是如何工作的

那么,它的背后是什么?它是如何工作的?
要理解我们需要深入了解编译器的内部。让我们创建这个简单的代码:

1
2
3
4
5
6
7
8
9
10
11
12
13
14
15
16
import { Component } from '@angular/core';

@Component({
selector: 'app-root',
template: `
<div>
<span>{{title}}</span>
<app-child *ngIf="show"></app-child>
</div>
`,
styles: []
})
export class AppComponent {
title = 'ivy-tree-shaking';
show: boolean;
}

现在,让我们运行ngc命令来生成转换后的代码:

  1. 对于视图引擎渲染器: node_modules/.bin/ngc
1
2
3
4
5
6
7
8
9
10
11
12
13
14
15
16
17
18
19
20
21
22
23
24
25
26
27
28
29
30
31
32
33
34
35
36
37
38
39
40
41
42
43
44
45
46
47
48
49
50
51
52
53
54
55
56
57
/**
* @fileoverview This file was generated by the Angular template compiler. Do not edit.
*
* @suppress {suspiciousCode,uselessCode,missingProperties,missingOverride,checkTypes}
* tslint:disable
*/
import * as i0 from "@angular/core";
import * as i1 from "./child.component.ngfactory";
import * as i2 from "./child.component";
import * as i3 from "@angular/common";
import * as i4 from "./app.component";
var styles_AppComponent = [];
var RenderType_AppComponent = i0.ɵcrt({
encapsulation: 2,
styles: styles_AppComponent,
data: {}
});
export {
RenderType_AppComponent as RenderType_AppComponent
};

function View_AppComponent_1(_l) {
return i0.ɵvid(0, [(_l()(), i0.ɵeld(0, 0, null, null, 1, "app-child", [], null, null, null, i1.View_ChildComponent_0,
i1.RenderType_ChildComponent)), i0.ɵdid(1, 114688, null, 0, i2.ChildComponent, [], null, null)],
function (_ck, _v) {
_ck(_v, 1, 0);
}, null);
}
export function View_AppComponent_0(_l) {
return i0.ɵvid(0, [(_l()(),
i0.ɵeld(0, 0, null, null, 4, "div", [], null, null, null, null, null)), (_l()(),
i0.ɵeld(1, 0, null, null, 1, "span", [], null, null, null, null, null)), (_l()(),
i0.ɵted(2, null, ["", ""])), (_l()(),
i0.ɵand(16777216, null, null, 1, null, View_AppComponent_1)),
i0.ɵdid(4, 16384, null, 0, i3.NgIf, [i0.ViewContainerRef, i0.TemplateRef], {
ngIf: [0, "ngIf"]
}, null)],
function (_ck, _v) {
var _co = _v.component;
var currVal_1 = _co.show;
_ck(_v, 4, 0, currVal_1);
},
function (_ck, _v) {
var _co = _v.component;
var currVal_0 = _co.title;
_ck(_v, 2, 0, currVal_0);
});
}
export function View_AppComponent_Host_0(_l) {
return i0.ɵvid(0, [(_l()(), i0.ɵeld(0, 0, null, null, 1, "app-root", [], null, null, null, View_AppComponent_0,
RenderType_AppComponent)), i0.ɵdid(1, 49152, null, 0, i4.AppComponent, [], null, null)], null, null);
}
var AppComponentNgFactory = i0.ɵccf("app-root", i4.AppComponent, View_AppComponent_Host_0, {}, {}, []);
export {
AppComponentNgFactory as AppComponentNgFactory
};
//# sourceMappingURL=app.component.ngfactory.js.map
  1. For Ivy: node_modules/.bin/ngc -p tsconfig.app.json
1
2
3
4
5
6
7
8
9
10
11
12
13
14
15
16
17
18
19
20
21
22
23
24
25
26
27
28
29
30
31
32
33
34
35
36
37
38
39
40
41
42
43
44
45
46
47
48
49
50
51
52
53
54
55
56
57
58
59
60
import {
Component
} from '@angular/core';
import * as i0 from "@angular/core";
import * as i1 from "@angular/common";
import * as i2 from "./child.component";
const _c0 = [4, "ngIf"];

function AppComponent_app_child_3_Template(rf, ctx) {
if (rf & 1) {
i0.ɵɵelement(0, "app-child");
}
}
export class AppComponent {
constructor() {
this.title = 'ivy-tree-shaking';
}
}
AppComponent.ngComponentDef = i0.ɵɵdefineComponent({
type: AppComponent,
selectors: [["app-root"]],
factory: function AppComponent_Factory(t) {
return new(t || AppComponent)();
},
consts: 4,
vars: 2,
template: function AppComponent_Template(rf, ctx) {
if (rf & 1) {
i0.ɵɵelementStart(0, "div");
i0.ɵɵelementStart(1, "span");
i0.ɵɵtext(2);
i0.ɵɵelementEnd();
i0.ɵɵtemplate(3, AppComponent_app_child_3_Template, 1, 0, "app-child", _c0);
i0.ɵɵelementEnd();
}
if (rf & 2) {
i0.ɵɵselect(2);
i0.ɵɵtextBinding(2, i0.ɵɵinterpolation1("", ctx.title, ""));
i0.ɵɵselect(3);
i0.ɵɵproperty("ngIf", ctx.show);
}
},
directives: [i1.NgIf, i2.ChildComponent],
encapsulation: 2
});
/*@__PURE__*/
i0.ɵsetClassMetadata(AppComponent, [{
type: Component,
args: [{
selector: 'app-root',
template: `
<div>
<span>{{title}}</span>
<app-child *ngIf="show"></app-child>
</div>
`,
styles: []
}]
}], null, null);
//# sourceMappingURL=app.component.js.map

它发生了很大的变化,但是一些主要的差异在这里很重要:

  1. 我们不再有factory文件,现在所有装饰器都转换为静态函数。在我们的例子中,@Component转换ngComponentDef
  2. 指令集发生了变化,因此tree shaking ,将小得多。

不仅仅是更小的捆绑包

如果我们看一下ngIf转换代码的部分:

1
i0.ɵdid(4, 16384, null, 0, i3.NgIf, [i0.ViewContainerRef, i0.TemplateRef], { ngIf: [0, "ngIf"] }, null)],

出于某种原因,我的应用程序组件与ViewContainerRefTemplateRef相关联,如果你想知道它们两个的来源,他们实际上是依赖NgIf指令实现的。

在Ivy中将变得更加简单,现在每个组件都引用了子组件或指令,但公共的API却更加清晰。意思就是当我们改变某些东西时,比如:NgIf的实现,我们不需要重新编译所有东西,我们可以重新编译NgIf而不是AppComponent类。

通过这种方式,我们不仅实现了更小的捆绑,而且实现了更快的编译,以及将库推送到NPM的更简单的方法。

使用Ivy进行调试

Ivy还提供了更简单的调试API。

让我们用(input)事件创建一个输入,并将它绑定到一个名为的不存在的函数search:

1
2
3
4
5
6
7
8
9
10
11
12
import { Component } from '@angular/core';

@Component({
selector: 'app-root',
template: `
<input (input)="search($event)">
`,
styles: []
})
export class AppComponent {

}

在Ivy之前,当我尝试在输入中输入内容时,我们会在控制台中看到它:
title
使用Ivy,我们的控制台将更加丰富地了解我们从哪里获得错误:
title

所以我们通过Ivy获得了另一个目的,更好的模板调试

动态加载

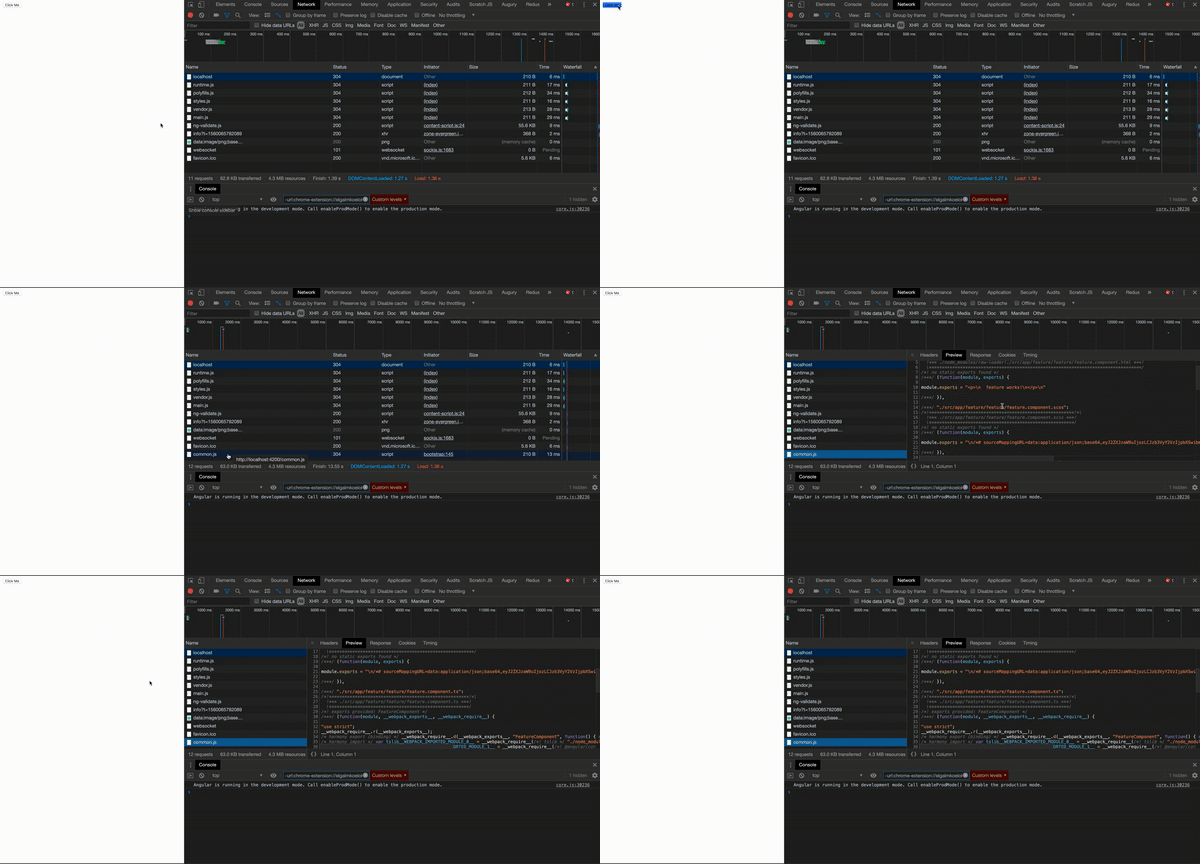
我们有一个简单的应用程序,有2个模块,应用程序模块和功能模块。功能模块将与路由器一起延迟加载,并将显示功能组件。所以,当我点击click me按钮时,我在网络中获得了功能模块:

代码

Angular 8带来了一个用于加载模块的新API,它现在支持ES6动态导入。

之前:

1
2
3
4
5
6
const routes: Routes = [
{
path: 'feature',
loadChildren: './feature/feature.module#FeatureModule'
}
];

之后:

1
2
3
4
5
6
7
const routes: Routes = [
{
path: 'feature',
loadChildren: () => import('./feature/feature.module')
.then(({ FeatureModule }) => FeatureModule)
}
];

有了这个,我们为什么不直接在组件上尝试相同的导入?

代码

结果如下:

图片标题

它实际上是工作了!! 但是等等……发生了一件奇怪的事。我们已经加载了一个组件,但没有在模块中声明它。
那么,我们还应该在模块中声明组件吗?或者,模块现在可选吗?我们很快就会回答这个问题,但首先,让我们尝试将此组件添加到视图中。

为此,我们使用ɵrenderComponent函数:

1
2
3
4
5
6
7
8
export class AppComponent {
loadFeature() {
import('./feature/feature/feature.component')
.then(({ FeatureComponent }) => {
ɵrenderComponent(FeatureComponent);
});
}
}

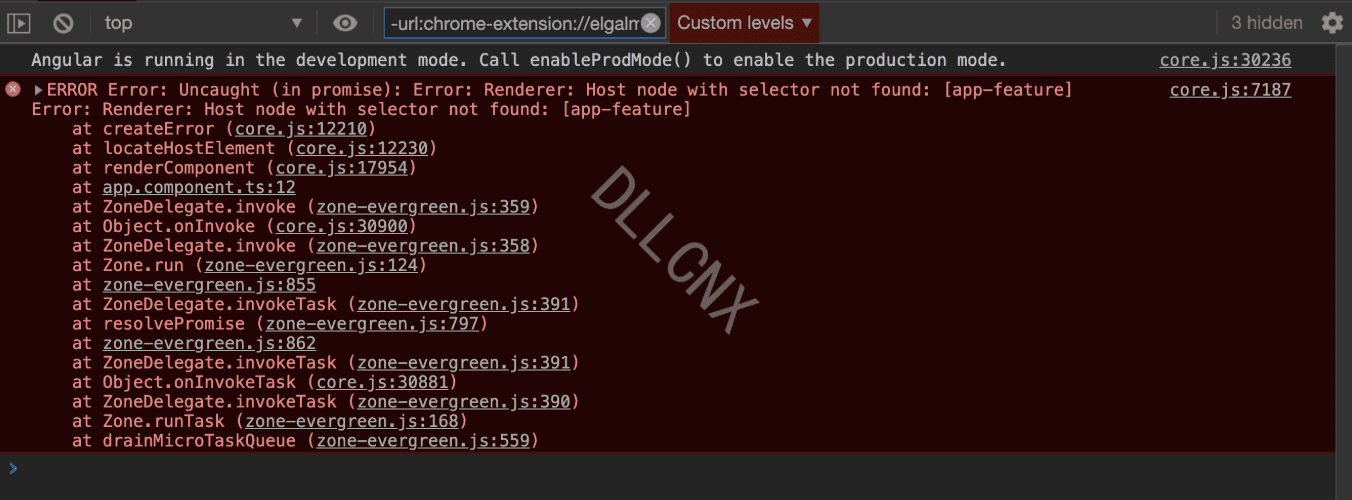
我在这里得到一个异常,这是对的,因为我们试图将组件附加到视图,但没有告诉谁是host元素对吗?
title
这里我们有两个选项,第一个 - 将FeatureComponent选择器添加到DOM,Angular将知道使用渲染选择器占位符的组件:

1
2
3
<button (click)="loadFeature()">Click Me</button>
<app-feature></app-feature>
<router-outlet></router-outlet>

或者renderComponent有另一个签名获取配置,我们可以设置host。我们甚至可以添加一个不存在的host,Ivy会将其附加到它:

1
2
3
4
5
6
loadFeature() {
import('./feature/feature/feature.component')
.then(({ FeatureComponent }) => {
ɵrenderComponent(FeatureComponent, { host: 'my-container' });
});
}

模块是否仍然必要?

正如我们刚才所见,我们不需要在模块上声明一个组件。现在我们所有人都想知道我们是否真的需要模块?
为了回答这个问题,让我们创建另一个用例 - 现在FeatureComponent将注入一个将在AppModule中声明和提供的配置:

1
2
3
4
5
6
7
8
9
10
11
export const APP_NAME: InjectionToken<string> =
new InjectionToken<string>('App Name');

@NgModule({
...,
providers: [
{provide: APP_NAME, useValue: 'Ivy'}
],
bootstrap: [AppComponent]
})
export class AppModule { }

FeatureComponent:

1
2
3
4
5
6
7
8
9
10
11
12
13
14
15
16
17
18
19
20
import { Component, OnInit, Inject } from '@angular/core';
import { APP_NAME } from 'src/app/app.module';

@Component({
selector: 'app-feature',
template: `
<p>
Hello from {{appName}}!
</p>
`,
styleUrls: ['./feature.component.scss']
})
export class FeatureComponent implements OnInit {

constructor(@Inject(APP_NAME) public appName: string) { }

ngOnInit() {
}

}

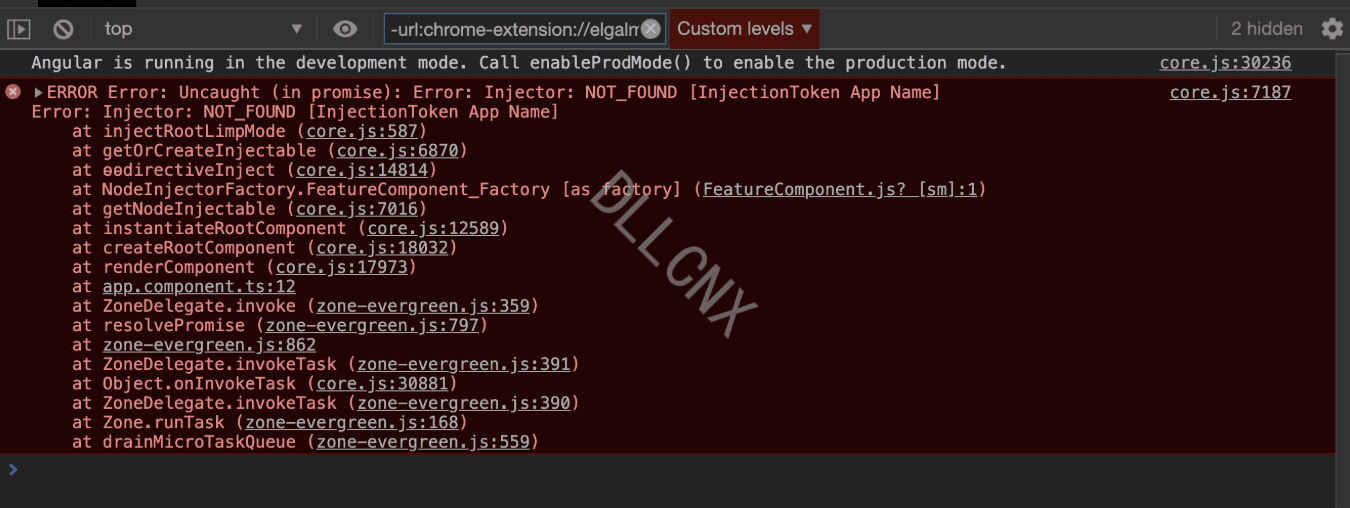
现在 - 如果我们再次尝试加载组件,我们会得到一个异常,因为我们的组件没有注入器:
title

在模块上没有声明组件也存在问题,我们实际上没有使用注射器。尽管如此,renderComponent配置还允许我们声明一个Injector:

1
2
3
4
5
6
7
8
9
export class AppComponent {
constructor(private injector: Injector) {}
loadFeature() {
import('./feature/feature/feature.component')
.then(({ FeatureComponent }) => {
ɵrenderComponent(FeatureComponent, { host: 'my-container', injector: this.injector });
});
}
}

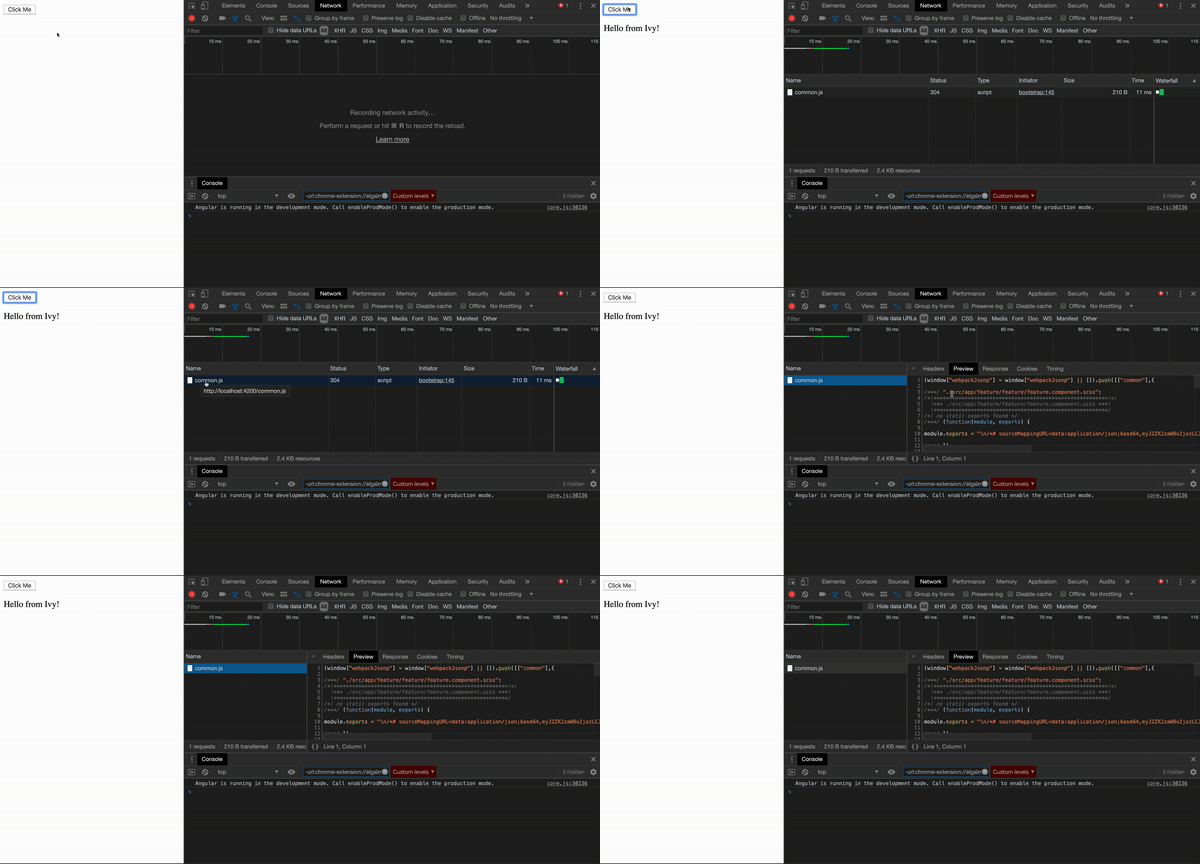
结果如下:

图片标题
好极了!有用!

高阶元件(HOC)

正如我们刚刚看到的那样 - Angular现在更加动态,它还允许我们实现像HOC这样的高级概念。

什么是HOC?

HOC是一个函数,它获取一个组件并返回一个组件,但也影响它们之间的组件。

让我们通过HOC,将它作为装饰器添加到我们创建的基本组件 AppComponent

1
2
3
4
5
6
7
8
9
10
11
12
13
14
15
16
17
18
19
20
21
22
23
24
25
26
27
28
import { Component, ɵrenderComponent, Injector } from '@angular/core';

@HOC()
@Component({
selector: 'app-root',
templateUrl: './app.component.html',
styleUrls: ['./app.component.scss']
})
export class AppComponent {
constructor(private injector: Injector) { }
loadFeature() {
import('./feature/feature/feature.component')
.then(({ FeatureComponent }) => {
ɵrenderComponent(FeatureComponent, { host: 'my-container', injector: this.injector });
});
}
}

export function HOC() {
return (cmpType) => {
const originalFactory = cmpType.ngComponentDef.factory;
cmpType.ngComponentDef.factory = (...args) => {
const cmp = originalFactory(...args);
console.log(cmp);
return cmp;
};
};
}

现在让我们利用HOC和动态导入的概念来创建一个惰性组件:

1
2
3
4
5
6
7
8
9
10
11
12
13
14
15
16
17
18
19
20
21
22
23
24
25
26
27
28
29
30
31
32
33
34
35
36
37
38
39
40
41
42
43
44
45
46
import { Component, ɵrenderComponent, Injector, ɵɵdirectiveInject, INJECTOR } from '@angular/core';

@LazyComponent({
path: './feature/feature/feature.component',
component: 'FeatureComponent',
host: 'my-container'
})
@Component({
selector: 'app-root',
templateUrl: './app.component.html',
styleUrls: ['./app.component.scss']
})
export class AppComponent {
constructor(private injector: Injector) { }
loadFeature() {
import('./feature/feature/feature.component')
.then(({ FeatureComponent }) => {
ɵrenderComponent(FeatureComponent, { host: 'my-container', injector: this.injector });
});
}

afterViewLoad() {
console.log('Lazy HOC loaded!');
}
}


export function LazyComponent(config: { path: string, component: string, host: string }) {
return (cmpType) => {
const originalFactory = cmpType.ngComponentDef.factory;
cmpType.ngComponentDef.factory = (...args) => {
const cmp = originalFactory(...args);

const injector = ɵɵdirectiveInject(INJECTOR);

import(`${config.path}`).then(m =>
ɵrenderComponent(m[config.component], { host: config.host, injector }));

if (cmp.afterViewLoad) {
cmp.afterViewLoad();
}
return cmp;
};
return cmpType;
};
}

谈论几个有趣的点:

  1. 如何在没有Angular DI的情况下安装injector?还记得ngc命令吗?我用它来检查Angular如何在转换后的文件中翻译构造函数注入并找到directiveInject函数:

    1
    const injector = ɵɵdirectiveInject(INJECTOR);
  2. 我已经使用HOC函数创建了一个新的“生命周期”函数afterViewLoad,如果它存在于原始组件上,它将在延迟到组件被渲染后调用

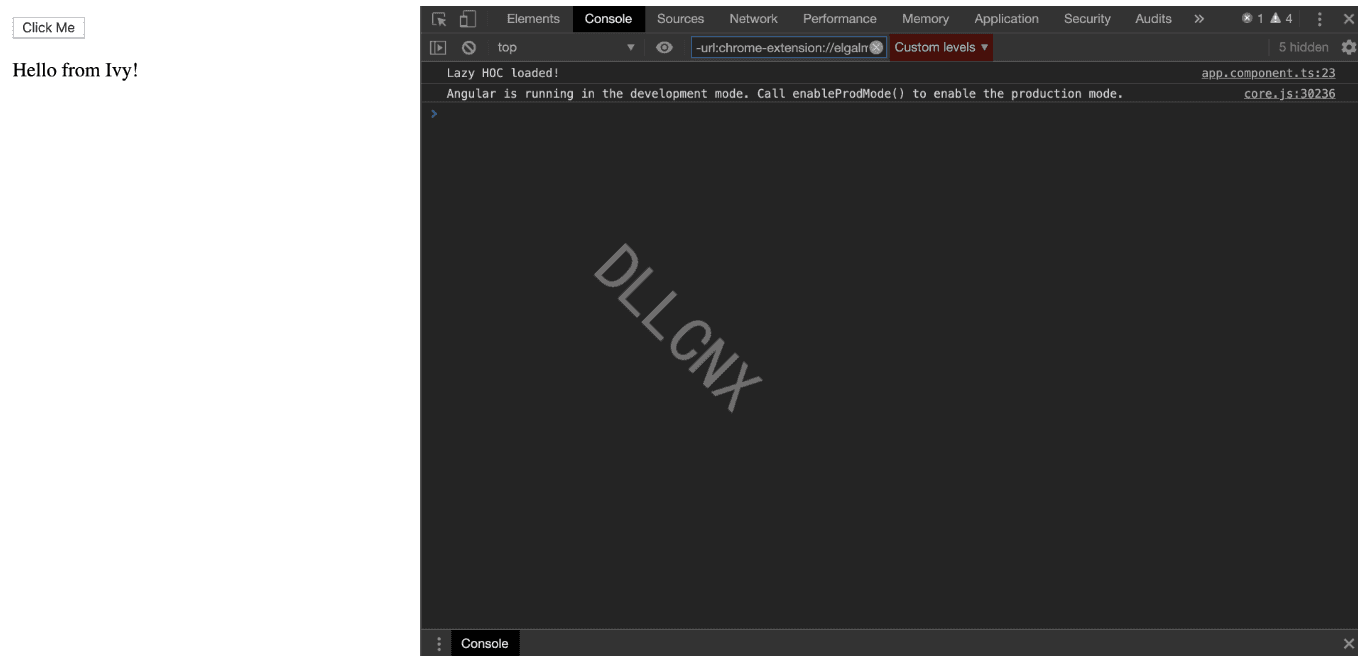
    结果(直接加载):

title

摘要

我们刚刚学到的内容的快速摘要:

  1. Ivy,第三代Angular编译器就在这里!它具有向后兼容性,通过使用它,我们可以获得更小的捆绑包,更容易调试API,更快的编译和动态加载模块和组件。
  2. Angular与Ivy的未来看起来很令人兴奋,有像HOC这样的酷炫和令人兴奋的功能。
  3. Ivy还为Angular Elements设置了基础,使其在我们的Angular应用程序中变得更加流行。
  4. 试试看!这就像设置enableIvy标志一样简单true

谢谢阅读!

原文链接